
UPDATE! Complete Shed plans are now available

I just completed the first phase of my shed project. I found inspiration, techniques and ideas for materials for the project from other DIY posts, so I decided to return the favor by sharing my own creative and construction process here.
I enjoy building things, but do not have much experience. The only other major project I have completed was a deck/screened porch behind my house. I’ll post about that soon.
Here are the sheds and sites that I turned to the most for ideas and inspiration for my design:
http://design-milk.com/deconstruction-david-van-alphens-modern-shed/
http://www.marinhomestead.com/diy/modern-shed-playhouse/
I like a modern style and like projects that mix different materials such as wood, concrete and metal.
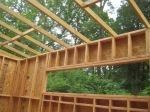
Here is a gallery of the project, and notes on the construction process.


Love your shed and would like to do one of my own. Can you please describe how you fastened the hard panels? did you use some kind of caulking?
Thanks! I did not use caulking but I suppose it couldn’t hurt. The Hardie panels are secured with 3 inch stainless steel screws and washers which reach through the sheathing and about two inches into the support. I pre-drilled for everything.
This looks fantastic. Do you remember (ballpark is fine) how much you spent on materials?
Thank you! Ballpark everything was around $4500. Mitigating the price were the windows and the glass door, which I found discounted at a salvage yard, and the cement panels that I salvaged from school where I work as they were doing renovations. Almost everything else was purchased from Lowes.
Beautiful. I live in Decatur and wouldn’t mind doing this in my backyard. Did you get permits from the county? Also, which salvage yard are you referring to?
From 3500 km away, in Alberta Canada… Thanks you for being one of the few people on the entire internet apparently,to post an entire gallery of pictures, complete with helpful,insightful comments. I look forward to using you and your shed as a guide to build almost an exact replica of your beautiful shed. Thanks again,
-James Mercier-
Thanks for your kind words and best of luck with your project, James. Please do post pictures when you’re done. You probably know this already, but in your case you may consider digging concrete footings below the frost line. Frost heave isn’t much of a problem in Atlanta – but I imagine things a little differently in Alberta! – Peter
Outstanding, and like James, would like to replicate your work. Your gallery is fantastic. Do you have any additional plans or material lists? I understand dimensions may be based on windows, doors etc., but what is the overall footprint of your shed? Thanks much.
Hi Jamie. Thank you so much. I am actually working on plans which I will make available for download here (for free!) In the meantime, the footprint of my shed is 10′ X 16′ and it is 8′ tall on the short side. I will have to remeasure the tall side, but I believe it is around 9′ 4″ (don’t quote me on that yet)
Thank you for sharing. That is pure awesomeness that you share your knowledge and experiences. I look forward to seeing the plans. Thanks again!
Very late reply, but wanted to say that plans are finally, finally done! My volunteer illustrator fell through, so I am asking a small fee to help recover the cost of paying for an illustrator. The plans are available here: https://diyatlantamodern.wordpress.com/2016/01/01/shed-plans-are-here/
Bravo!
And nice bikes too…….
we love it!! did you get the plans available for download done yet?? 🙂
I got sidetracked when it came time to remeasure the roof! I will try to complete this soon. In the meantime, please let me know if you have any questions. And thanks!
Finally, finally, the plans are available. Check out the latest post here: https://diyatlantamodern.wordpress.com/2016/01/01/shed-plans-are-here/
Im wondering if you ever finished the downloadable plans for this shed? I would love to see them. Your shed is fantasticsuperawesome. I am about to start my own project and I am using your shed as my guide.
Haven’t finished yet – my buddy is working on the illustrations now. Don’t wait for us – it looks like it is going to take us a minute…
Update! The plans are finally, finally ready. Here is the link: https://diyatlantamodern.wordpress.com/2016/01/01/shed-plans-are-here/
What size is your roll up door and what kind of beam did you add to support it? I really like the idea to have a roll up door since i will also be housing my motorcycles. Thank you!
The metal roll up door is 6′ X 8′, from a company called Janus, based in Temple, GA: http://www.janusintl.com/. I framed the beam with two upright 2″X6″s (with strips of 1/2″ plywood between) sandwiched between 2″ x 4″s top and bottom- pretty much exactly what he does in this video, but with 2″ X 6″s: https://www.youtube.com/watch?v=oXfVf48rAug
I used 4″ x 4″s for the vertical posts that hold the beam- Probably overkill- the door did not end up being as heavy as I expected. I think Janus provides some guidance on the jamb framing with the installation instructions as well.
Thank you for the answer!
I’d love to see some interior photos!
I’ll try to snap/ post a few soon!
what size is this shed? I want to build a 10 x 20.. where can I get a builders guide for this model?
My shed is 10′ X 16′. I am working now with an illustrator to develop the plans. My hope is to have them ready by the end of the summer. In the meantime, please let me know if you have any questions, and good luck with your project!
Shed plans are finally here! Still working on posting some interior shots: https://diyatlantamodern.wordpress.com/2016/01/01/shed-plans-are-here/
Very nice! Love the style of your shed, very modern. I wanted to build something similar a while back but ended up with something out of blue while building on the fly. I’ll file this away should I ever need to build another one. Nicely done.
Love your shed and am working on my own right now. Since there isn’t any siding up at the top by the windows, how did you make sure the studs and top plates up there are water/weather proof?
Thanks! Would love to see your project. The framing of the windows in the extended section is with pressure treated wood, which I painted. Below this, there is a tiny bit of the top edge of the OSB wall sheathing exposed I suppose, but it is also painted and is below the overhang of the roof. I also ran a bead of caulk along the line where it meets the framing just to be safe. It would take a pretty good angle for any significant rain to get onto this edge, and it seems to be handling moisture just fine.
Looks great! Any luck with the plans?!
Thanks! So sorry! Still working on them. They are taking forever. I have hired an illustrator and we are making progress….
Here you go! https://diyatlantamodern.wordpress.com/2016/01/01/shed-plans-are-here/
what type of wood siding did you use?
The horizontal wooden boards used as siding is cedar.
hi love this shed
do you think novice builders can manage this ?
thanks
Thank you! Yes, I think they can. Prior to building this project, I had no training and very little experience in construction and I still consider myself a novice. I think the qualities that you need are essentially: the willingness to try, the willingness to learn as you go, and the love of making things. With that said, it helps to have some basic comfort with things like table and circular saws and other power and hand tools- but all of these skills you will learn by doing. As is the case with every project I have ever done, I made mistakes along the way and got better as I worked.
thanks so much have had some experience and looking to embark on something new and more challenging
I live the shed–going to make one like this. Thanks fir the wonderful infor & pictures!!
Thank you! I really appreciate the compliment and wish you the best with your project!
Pingback: Parent’s Shed: Planning | BINH. LOVE. LIFE.
I like this shed, nice work. Such a similar one will be standing in my garden soon. What I am thinking about is the contact of wood and soil. How long will the wood last? Thanks for your opinion.
I do not recommend putting posts directly into the soil. Instead, if your soil is settled enough and is fairly level, you can use concrete deck piers like this (http://www.homedepot.com/p/10-in-x-10-in-x-10-in-Concrete-Deck-Block-55N1AN/206125490) But, if the soil is not settled, or if you are building on a slant, or you live in a colder climate where there is frost heave, you may need to dig holes and pour concrete and use a galvanized elevated post base like this: http://www.homedepot.com/p/Simpson-Strong-Tie-4-in-x-4-in-12-Gauge-Hot-Dip-Galvanized-Pier-Block-Elevated-Post-Base-EPB44PHDG/100506799
In either case, you should not put the wooden posts or any wood directly in the soil, especially if you live in a wet, humid climate like I do in Atlanta. And, as always, be sure to check the code in your area and notice how other decks or sheds are built near you. Good luck with your project!
Very nice. Great to see so many pictures, think I USE this as an approach when building one on my own.
Im from Norway, so I think I USE concrete on The deck. Thanks for sharing
Thanks! Good luck with your project. Yes, I think depending on your environment, concrete footings may be better. If you have a lot of snow, you should also consider solid roof decking and bigger rafters.
Hi there, I love the open siding design. I am curious how house wrap is holding up to UV exposure between the boards? Did you use one resistant to UV? Thanks!!
Thank you! The space between the cedar siding boards is about 1/2″ and the boards are 3/4″ deep- there is almost no direct sunlight at any time of year that hits the roofing felt which was used for the wrap. I can honestly say that after four years, I see no change in coloration. I don’t recall whether the roofing felt that I used was UV resistant but in the case of my project I do not believe this would be a concern.
Thank you!
Do you know what the recommended spacing is for the pier blocks are? I have been unable to find any and Home Depot was not helpful. Great looking shed!
Thanks! Mine are placed 24″ oc down the long side of the shed, 3 deep (about 47″ oc) along the short side. I can’t remember the website that I found recommending this, but I believe it was linked to the manufacturer of the blocks. I remember being surprised that I had to use so many. For my 10′ X 16′ shed I used 27 (3 X 9)
Pingback: DIY Modern Shed project - Woodwork Cafe
Pingback: Renovate Your Backyard Shed | Fantastic Handyman Australia
Pingback: #garage UPDATE! Complete Shed plans are now available. Check out the latest post on diyatlantamodern.... here: I just completed the first phase of my shed project. I found inspiration, t…... - DIY Ideas
Pingback: #garage I made the skylights with plastic corrugated roofing panels. Lots of natural light.... - DIY Ideas
Pingback: DIY Modern Shed Build on a Slope – Adam Jacono archive
Pingback: 20 Small Storage Shed Ideas Any Backyard Would Be Proud Of - interior4you
Pingback: 20 Small Storage Shed Ideas Any Backyard Would Be Proud Of – Home Inspiration Ideas
Pingback: 20 Small Storage Shed Ideas Any Backyard Would Be Proud Of – A Luxury Bed – Silk Sheets Bedspreads Luxury Bedding
Hello,
This project is wonderfull.
How much is this shed?
Thank you
Matthieu
Hi Matthieu,
Thank you!
On my project, I spent approximately $4500 total. Raising the price was some of the choices for materials – such as cedar boards for the siding, and stainless steel decking screws as exposed fasteners, etc. as well as the large size.
On the other hand, I saved some money by using a salvaged door and salvaged windows.
I think you could definitely build it cheaper depending on these types of choices.
Please let me know if you have any other questions!
All the best,
Peter
Thanks millions Peter to share the detailed photos. As a bit new DIYer, it is absolutely helpful to see your photos and it would be my big project early next year to my backyard. Will come back to you more questions if I may.
Cheers, Jay
Hi AtlantaModern:
Shed looks great. I am about to start a similar project, but I am wondering about the weather resistance of the siding choices. There is spacing between your HardieBoard panels and also between your Cedar panels. How is this spacing holding up to the rain and snow? Does that under-layer of roofing felt provide adequate protection over a long period of time ?
Rock on, GP.
No issues at all with the spacing on the side, which was an intentional “rain screen,” allowing the water to run down to the ground without pooling anywhere on the siding to cause rot. Also note that in Atlanta we get little to no snow. The only thing I may change in your project if you are in a very snowy area would be to skip the “skylights” – those plastic roofing panels are pretty flimsy and would probably not hold the weight very well. I would also go up to 2X6 rafters for the roof (or even 2X8s) to be on the safe side. Happy planning!
Pingback: 27 Fantastic Storage Shed Ideas For Your Garden - GoViral
Pingback: DIY Shed Design Ideas – How To Build A Garden Shed From Scratch - furniturebudget.com
Pingback: DIY Shed Design Ideas - How To Build A Garden Shed From Scratch - decorblondie.com
Pingback: 35 DIY Garden Den ug Mga Ideya sa Shed - lineup-mag